Tips for Planning a Smocked Bishop Design


The bishop is one of the most versatile designs in children's clothing. A voile bishop with lacy sleeves is perfect for a formal event, while a romper or playsuit with a bishop neckline is both cute and functional. Before constructing a bishop design, you need to decide what kind you'd like to make and select your pattern, fabric and smocking plate. To help you, we'd like to share the following hints from designer Maggie Bunch. These tips and more can be found in our special issue Favorite Heirloom Sewing Designs.

Patterns - Chances are you have more than one bishop pattern. In addition to independent designer patterns, check smocking magazines and books. Not all bishops are created equal! Take time to compare patterns. Lay the front section of one pattern on top of the front of another. Note the differences in the arm curve at the top and side. Compare the width of each piece. Check the length. You may find what works for one look does not work for all the bishops you have in mind.

Fabric - Each pattern is designed for a specific weight of fabric. Many bishop pattern instruction sheets recommend using lightweight fabrics such as batiste. You may use the pattern as it is for the recommended fabric. However, if your pattern is designed for batiste, but you wish to use a heavier fabric, use a pattern that has reduced fullness or make adjustments to your pattern.

The following pictures show three bishops cut from the same pattern. The fabrics are Imperial batiste, Concord cotton calico and Spechler-Vogel corduroy. Each bias neckband is cut to the identical length. Note the batiste pleats are nicely spaced (photo 1A). The calico pleats are tightly packed, but still fit the neckband (photo 1B). However, the corduroy bishop does not fit the neckband at all (photo 1C). 


Pleat a sample of questionable fabric to see how much bulk needs to be eliminated. To remove fabric from the bishop, take equal proportions out of each section: front, backs and sleeves. Fold the center of each pattern piece to maintain the correct neck and hemline curves.

Fibers - Fabric sometimes has a different appearance when it is pleated. Choosing fibers and colors after pleating is more efficient. Working a few stitches will help you make the final decision. Remember, three strands of embroidery floss are not the only option for smocking. Try two strands for a delicate look; try four strands for smocking a novelty print. Branch out! Try new fibers such as floche and stranded silk.

Smocking Plate - Bishop design plates are slightly different than straight yoke plates. For a bishop, look for a smocking design that uses stitches with less give at the top (neck) such as cable, stem and outline stitches. Stitches become progressively more open toward the lower rows of the design (shoulder). Lower rows are usually trellis stitches, possibly trellis/cable combinations. Straight yoke plates tend to have less giving stitches for the top and bottom rows. 

The pattern dictates the number of rows of smocking. Look at the arm curve on the pattern. There is a straight portion from the top down, then it begins to curve. The portion you will smock is the straight section. Measure this straight section against your brand of pleater to determine the number of rows you can pleat on that size (photo 2). Remember to include holding rows. Not all bishop plates are suited for every size bishop. Most commercial plates for bishops are easily adjusted. 


Change the number of rows on larger or smaller bishops by adding or eliminating a repeat of a row at the top or bottom of the design. When adjusting designs, take out the row least likely to affect the flair of the bishop at the shoulders.

Learn how to sew a beautiful bishop dress on the Ready-to-Smock - Smocked Bishop Construction DVD with Connie Palmer. You'll also discover valuable tricks as Connie reviews perfect neckbands, plackets, a variety of sleeve finishes and much more!

Sew On, Sew Well, Sew Beautiful,
Cyndi and Amelia

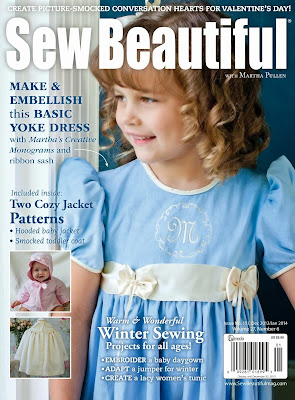
Warm & Wonderful Winter Sewing Inspiration

December 2013/January 2014
Our December/January edition of Sew Beautiful features winter-inspired projects for both little ones and adults. The free pattern is a beautiful smocked children's coat designed by Laurie Anderson, and we've also included lacy heirloom designs and embroidered inspiration great for any time of the year. Here's a peek at a few of our favorite designs:

Baby Jacket & Bunting (left) and Daygown
Embroidered Baby Jacket & Bunting - Wrap baby up in the snuggly warmth and comfort of Wendy Schoen's precious embroidered jacket and matching bunting wrap. Linen floss flowers adorn the hood and bunting while prancing lambs made of countless French knots are sprinkled about the front of the jacket. 

Train Embroidered Daygown - An embroidered choo-choo train lends handmade charm to this classic daygown from designer MichiĆ© Mooney. The embroidery's simplistic outline is perfect for beginners!

Ribbon Sash
Ribbon Sash - A wide ribbon sash, drawn into stitched bows with fine ribbon tendrils, can lend a special design element to any garment. In this how-to, Connie Palmer will show you how to create this gorgeous sash and sew it to a simple yoke dress.

Dogwood Flowers (left) and Farmhouse Jacket
Dogwood Flowers - Learn Nicholas Kniel's unique approach to making lovely blooms out of ribbon in an excerpt from Creating Ribbon Flowers: The Nicholas Kniel Approach to Design, Style, Technique and Inspiration. Make these dogwood flowers, which are great for everything from a bridal boutonniere to a simple straw hat.

Farmhouse Jacket: An Embroidered Wrap Design - Embellish any basic wrap jacket pattern with a beautiful floral motif from designer Gail Doane. The sweetly embroidered design combines a circular blanket stitch, cast-on flowers and tiny buttons.

Visit our online store to learn more about this new issue!

Sew On, Sew Well, Sew Beautiful,
Cyndi and Amelia 

Smock an Alternating Cable Stitch

Cables, outlines, stems and waves - there are so many lovely smocking stitches we can combine to create beautiful smocked designs for our garments. Today, we'd like to share a step-by-step tutorial for the alternating cable stitch from our friends at Australian Smocking & Embroidery magazine. Also known as cable picot, this is an attractive stitch that can be worked in a single color or two colors for varying effects.

Example was smocked with two strands of DMC satin stranded rayon.


1. Base row of cable. Work a row of cable.

2. Bring the thread to the front on the right-hand side of the first pleat, a needle's width below the first stitch of the base cable row.

3. Take the needle back through the first pleat from right to left.


4. Pull the thread through. Work two cables (an over cable then an under cable).

5. For the third cable, keep the thread below the needle and angle it to emerge on the left side of the same pleat, a needle's width above the base row.

6. Pull the thread through.


7. Work two cables (under, over). With the thread above, take the needle through the next pleat, angling it to emerge on the left side of this pleat below the base row.

8. Pull the thread through. Work two cables (over, under). For the next cable, angle the needle through the pleat. Emerge above the base cable row as in step 5.

9. Continue alternating between three cables below the base row and three above. End off the thread securely.

For more inspiration, don't miss The Best of Australian Smocking & Embroidery. This special issue includes eight multi-size patterns, tips, techniques and much more!

Sew On, Sew Well, Sew Beautiful,
Cyndi and Amelia

Sew Matching Flower Motifs for a Girl and Doll

Yo-yo flowers pictured on the T-Shirt Dress from All Dolled Up.

Create coordinating outfits for a girl and her 18-inch doll with help from these fun yo-yo flowers. Designed by doll dress designer Joan Hinds, these embellishments are super easy to make and are sure to brighten the day of your favorite little doll lover.

To make the flower embellishments, all you need is fabric of your choice and two buttons. Joan recommends using a 3/4-inch button for a girl and a smaller 3/8-inch button for an 18-inch doll. 

When you are finished making the flowers, tack them on to a T-shirt or project of your choice. Complete instructions for the matching T-Shirt Dresses pictured here can be found in Joan's book All Dolled Up.

Fig. 1 (left) and Fig. 2

Yo-Yo Flower for Girl:
1. To make a yo-yo flower for a girl's garment, cut a 4-1/2 inch (11.4cm) circle from the fabric. 

2. With a hand sewing needle and matching thread, work running stitches around the edge of the circle about 1/8 inch (3mm) in from the edge (fig. 1). Pull tightly and flatten the circle. Tie off and sew the 3/4-inch button to the center of the flower to cover the raw edges (fig. 2). 

3. Tack the flower to the upper left of the T-shirt.

Yo-Yo Flower for Doll:
1. For the yo-yo flower for a doll's garment, cut a 2-1/4 inch (5.7cm) circle from the fabric. 

2. With a hand sewing needle and matching thread, work running stitches around the edge of the circle about 1/8 inch (3mm) in from the edge (fig. 1). Pull tightly and flatten the circle. Tie off and sew the 3/8-inch button to the center of the flower to cover the raw edges (fig. 2). 

3. Tack the flower to the upper left of the T-shirt.

The Perfect Party Dress for Your 18-inch Doll
That's all there is to it! Check out Joan's brand new DVD, The Perfect Party Dress For Your 18-inch Doll for more doll sewing fun. On this DVD, Joan will guide you in constructing a to-the-waist lined yoke dress with a gathered skirt, puffed sleeves and a double-ruffle hem. You'll learn tons of tips and techniques along the way, and doll shoes are included as a bonus project to complete this party dress ensemble.

Sew On, Sew Well, Sew Beautiful,
Cyndi and Amelia